Friday, January 16, 2009

How to configure Citrix XenApp Plugin site

Citirx XenApp Plugin is formerly known as Program Neighborhood Agent, which enables the Citrix clients to automatically log onto a farm and access published applications like a normal local program.

There is an excellent article to describe the procedure on how to configure it on Web Interface and clients here. But I decide to write a complete guide based on my practice.

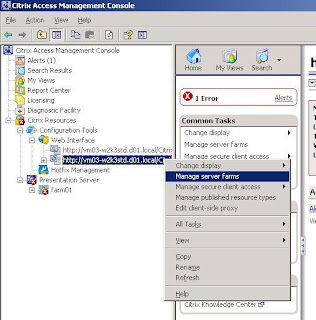
1. Create a PNA site on the Web Interface in the Access Management Console
- Start the Create Site wizard- Select XenApp Services as the type of the site!
- Accept the default settings for IIS Location (/Citrix/PNAgent) unless you want your own URL, for example /PNA)
- After the site is created successfully, you need to configure it now
- You will need to enter the farm settings (farm name, at least one XenApp server in the farm, and port if it's not the default value of 80)
- Please select the correct Published Resource Type for your farm, either Remote, or Streaming, or both
- Finish the site creation and initial configuration

2. Perform advanced configuration
- You can perform advanced configurations by right clicking the newly created site as well as config.xml under it- At site level, you can modify the farm settings (to add a new farm, for instance) and change DMZ settings as a usual site
- You can also configure the authentication methods. By default, Prompt and Pass-through are selected and Pass-through is the default authentication method. Especially, I will set "Allow users to save password" for Prompt method
- I usually configure "Manage shortcuts" on config.xml so that the Start Menu and Desktop shortcuts can be configured cleanly and removed when user logs off. This, of course, depends on your environment

3. Now you need to restart the web site in IIS admin for the changes to effect

4. Set up the client
- Install the XenApp Plugin
- Run the client named "Citrix XenApp", formerly known as "Program Neighborhood Agent"
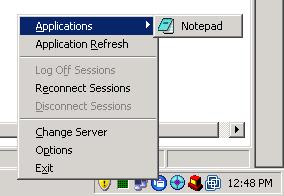
- You will be prompted to enter the server address (of the config.xml file) as below. Update it and you will be able to connect to the site automatically (if Pass-through is set as the default authentication method), or user ID, password and domain (if Prompt is the default)- After the login and applications are refreshed, depending on your configurations of "Manage shortcuts" on config.xml, you now should access published applications from Start Menu, Desktop, or by right clicking the XenApp Plugin icon in the system tray
Thursday, January 1, 2009

Set up vnc server on Fedora

It's been painstaking for me to set up Xvnc server on my Fedora 10 Linux server, so here I summarize the steps for future references.

1. Download and install the tightvnc-server rpm package from tightvnc web site.
2. I've got the following error now when I try to run the command "Xvnc". Unfortunately I have to download and install the font rpm package, xorg-x11-fonts-misc.
Could not open default font 'fixed'
3. Create the folder, /usr/X11R6/lib/X11/fonts.
4. Create the soft link as below,
ln -s /usr/share/X11/fonts/misc /usr/X11R6/lib/X11/fonts/misc
5. Set the vnc password with the command "vncpasswd". The maxim password length is 8!
6. Edit $HOME/.vnc/xstartup and comment all the lines. Add the desktop session that you want to start. For example,
startkde (if you want to start KDE)
gnome-session (if you want to start GNOME)
7. Start Xvnc with the command "vncserver",
- Edit /usr/bin/vncserver and add the fontPath environment variable if necessary. In our case, it's "/usr/X11R6/lib/X11/fonts". Moreover, you need to add Write permission to this file before editing it.
8. Check the firewall settings and open the 5801/5901 (5802/5902, etc.) ports, if necessary.
9. On the client, access the Xvnc server via VNC Viewer at the port 5901, or http://:5801 from the browser.

Notes:
- VNC authentication is based on a common password only. If you want to access the desktop with whichever user's session, edit xstartup in that user's home directory. For example, if you run "vncserver" from root's session, edit /root/.vnc/xstartup, run "vncserver", and then remote users will log onto root's desktop. Similarly, if you start vncserver from the user ''s session, edit xstartup at /home//.vnc accordingly.
- Run the command below to kill a vnc process

vncserver -kill :
vncserver -kill :1 (example, kill the first vncserver process at display 1 and port 5901)

Monday, December 8, 2008

Install software and save settings on Wyse XPe devices (V90L)

Details can be obtained in the Wyse XPe Admin Guide manuals (located in http://www.wyse.com/manuals) and Microsoft description (http://msdn.microsoft.com/en-us/library/aa940926(WinEmbedded.5).aspx).
  1. Log off user. Press and hold the Shift key during logoff so that the logon screen is prompted.
  2. The user ID and password are both "Administrator" for you to log onto the Adminitrator desktop.
  3. Double click the desktop icon, FBWF Enable, to enable File Based Write Filter, which will immediately reboot the device.
  4. After the reboot, there will be a green balloon in the system tray to indicate that File Based Write Filter is running.
  5. Make the changes in the normal User sessions, e.g. create custom ICA settings and desktop icons. ICA connections created in the PN under the Administrator account is not accessible to normal User.
  6. Log off and log onto the Administrator desktop.
  7. Install the software and make other priveleged operations here.
  8. Double click the FBWF icon in the system tray to open the File Based Write Filter Control dialog box.
  9. Click Commit Changes button to save your configurations.
  10. Reboot the device to verify the settings.
  11. Double click the desktop icon, FBWF Disable, to disable File Based Write Filter, which will immediately reboot the device.

Thursday, December 4, 2008

Publish Lotus Notes client in Citrix

There is a Lotus Technote 1202109 to guide how to publish Lotus Notes client in Citrix XenApp (Presentation) server. But here I need to add a few more comments.

Step #1.b: Lotus Notes shall be installed with the Add/Remove Programs snap-in. Alternatively, you can change your current session to Install mode by running "change user /install" and run setup.exe to install Lotus Notes client.

Step #4.Script A: I didn't create this logon script. Instead, I created system environment variable, RootDrive. This can be completed by opening Control Panel > System > Advanced (tab) > Environment Variables (button), and add a new system variable (not a user variable in the upper section!).

Final Step: You must log off and log on with a unprivileged user account to launch Notes. If you open it under an administrative account, then it will report an error, "CLFRJ0010E: Notes initialization failed", when a second administrator tries to open Lotus Notes on the same terminal server. However, two or more unprivileged IDs could use Notes concurrently. I checked but there is no Technote to describe this error.

Additional Step: You must run "change user /execute" to be able to run Notes in your session. Otherwise, it will fail.

Friday, June 13, 2008

Minimal rights to remotely monitor performance by WMI

I tried to write a vbscript to monitor several memory performance counters on some Windows 2003 domain member servers, and send me an email if any counter is greater or less than the threshold. The script itself is simple but I don't want to assign Administrators permission to the service account which schedules and runs this script. So below are the minimal rights I found to meet this requirements,
 
1. I created an AD group, mydomain\Performance Monitor Users, and then add the service account to the group.
 
2. To monitor performance locally, you just need to add the AD group to the built-in local group, Performance Monitor Users, on the servers to be monitored, e.g. mycomputer1.
 
3. To remotely access the performance counters by WMI, you must have remote permissions for DCOM and WMI namespaces. Microsoft has an article to explain it in detail (http://msdn.microsoft.com/en-us/library/aa393266(VS.85).aspx). Below is a straightforward implementation.
 
3.1 Add "mydomain\Performance Monitor Users" to the built-in local group, Distributed COM Users, on mycomputer1.
 
3.2 On mycomputer1, open Computer Management console, expand the Services and Applications tree, double-click the WMI Control, right-click the WMI Control icon, choose Properties, and then select the Security tab. Here you can see all the namespaces. Usually you just need to grant Enable Account and Remote Enable permissions of Root\CIMV2 to mydomain\Performance Monitor Users.
 
3.3 The default permission is set as This namespace only. But my Windows 2003 SP1 server can only display the Root namespace, not any of its subnamespaces. In such a case, I have to configure the advanced security permissions to be This namespace and all subnamespaces.
 
3.4 All the membership and permissions on mycomputer1 are set for "mydomain\Performance Monitor Users". By this way I can easily control which user account in the AD group will have the permissions described in this article. If you set the WMI remote access for a local user account or group, e.g. Performance Monitor Users, there might be someone else adding other user accounts to Performance Monitor Users later to obtain more rights. It could be a security hole and nightmare if you've got many member servers in your domain.
 
4. In this last step, I scheduled a task to run the script on a central server to collect performance data, but it could not be started! The reason is that "mydomain\Performance Monitor Users" doesn't have Read and Execute permission for cmd.exe. After assigning this permission to both cmd.exe and the script file, my script is running perfectly.